Based on student needs to develop a virtual d-pad for use
with an animated sprite, I have decided to write out directions on how to do so…
For my example, I decided to create a new class called Draw
which will extend View and handle drawing of sprites for both my spritesheets
and my d-pad sprites, as well as updating user inputs and sprite movement. So if you are following along my suggestion
is to make a new View class like I have here, complete with a constructor.
public class Drawing extends View {
public Drawing(Context
context) {
super(context);
}
}
Then in your Activity
class, simply set the content view to this View.
View newView = new Drawing(this);
setContentView(newView);
I am first going to make touch controls to one of my arrows,
I will choose to make it for my right arrow.
Rule of thumb for most mobile applications is to use .png images for all
sprites. You can put the .png for the
arrow(s) in a drawable folder within your project. The right arrow that I am using is 40x40
pixels and has some spacing around it, which is useful for laying out the other
buttons since on a mobile application you may want to leave extra spacing in
order to consider multiple thumb/finger sizes.

Next I am going to declare a new Bitmap for my right arrow.
Bitmap rightArrow;
Then within the constructor I am going to define my right
arrow as the drawable sprite.
rightArrow = BitmapFactory.decodeResource(context.getResources(),
R.drawable.rarrow);
I will then make an onDraw method which I will use to draw
sprites.
@Override
protected void onDraw(Canvas
canvas){
}
Within the onDraw method, I will then draw the rightArrow on
canvas using the drawBitmap function, which takes a drawable bitmap and an x
and y position, I made my x position 50, and my y position 400 so that the
arrows are close to the bottom of the screen, however, I suggest that if you
want to take advantage of multiple resolutions, to use dynamic parameters, like
the screen width and screen height when calculating the x and y positions of
each button. For testing purposes we
will just leave these locations as static numbers for now.
canvas.drawBitmap(rightArrow, 50, 400, null);
I will now create touch events for the d-pad button. I will start by creating a Boolean method for
my touch event, which will return true.
public boolean
onTouchEvent(MotionEvent touchevent){
return true;
}
Within the onTouchEvent method, I listen for Motion Events,
to do so I will listen specifically for both ACTION_DOWN and ACTION_UP, so that
I can calculate where the user is touching and if they are touching in a
specific spot on the screen, I can perform some logic… If the user is not
touching the screen, I can also perform
logic for what happens when the user is not touching the screen at all…
So to listen for ACTION_DOWN, simply write an if condition
like this.
if(touchevent.getAction()==MotionEvent.ACTION_DOWN)
Within the if condition, calculate an x and y position by
use of your newly made touchevent MotionEvent.
It would be best to save these positions in a float, so I will make two floats called xT
and yT, and define them within the ACTION_DOWN if condition like so.
xT=touchevent.getX();
yT=touchevent.getY();
After defining x and y touch locations, create a nested if
that will check to see if the user touched anywhere within the vasinity of the
right arrow. So based on the placement
and size of the arrow (the arrow in my cases was 40x40), I will check to see if
the x position of the touch location is more than or equal to the initial
location of the arrow sprite and the x location of the arrow sprite plus the
width of the arrow sprite, AND if the touch location is more than or equal to
the y location of the arrow and less than the y location plus the length of the
sprite. If it is, we will set a
variable, in my case touchR, equal to 1 (TouchR will be an int where we can
keep track of if the player touched the right arrow, this could also be a Boolean).
if(xT>=50 && xT<=90 && yT>=400 && yT<=440)
touchR=1;
Outside of the ACTION_DOWN if condition, form an ACTION_UP
else if condition which will set touchR equal to 0, meaning that the user is no
longer touching the screen if ACTION_UP.
So in the end my touch event looks something like this…
public boolean
onTouchEvent(MotionEvent touchevent){
if(touchevent.getAction()==MotionEvent.ACTION_DOWN){
xT=touchevent.getX();
yT=touchevent.getY();
if(xT>=50 && xT<=90 && yT>=400 && yT<=440){
touchR=1;
}
}
else if(touchevent.getAction()==MotionEvent.ACTION_UP){
touchR =0;
}
return true;
}
You can proceed to do this for every arrow you are planning
to have, generally you would make a nested if condition to determine the
threshold for each arrow on the d-pad.
We will also eventually make an update method which will be responsible
for updating our logic and will be called each time the onDraw method is
called, but first I would like to skip over properly drawing a
spritesheet. In this case I will be
drawing a character spritesheet which has 4 walk cycles, a down, up, left and
right cycle. The spritesheet that I am
using is of a very popular character, Chrono.
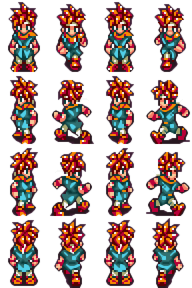
The important thing with spritesheets is positioning the
cycles in proper cells prior to programing them into your application. If you look at this spritesheet you will
notice that the size of it is 192x288. If I divide the width and height by 4 to
separate each image in the spritesheet into single cells, I will get 48x72,
which in essence becomes the size of each cell.
It is important that row by row, each cell perfectly aligns by both
height and width and each image is within its own cell (otherwise portions of a
sprite might bleed over to another cell which would cause portions of the wrong
cell to play when it is called).
Moreover, you need to always be sure that each sprite sequences properly
from cell to cell and the sprites are aligned with a similar pivot point and
centering as one another. When I align
sprites, I typically find what I want to be an anchor point of an image and
make sure that from cell to cell I use the same anchor point and put it in the
exact same position as the previous cells.
For instance if we look at row one, I can use Chrono’s belt buckle as an
anchor where I can center the belt buckle in the cell for each image in the
walk cycle on row one, this way, when the walk cycle animates, Chrono does not
jump around or jitter from frame to frame.
Note centering sprites in their cells is not always the answer, you have
to judge where the pixels of each sprite should be based on the animation you
are meaning to do.
So first I will declare a Bitmap for my spritesheet.
Bitmap spriteSheet;
Then I will define it in my constructor
spriteSheet = BitmapFactory.decodeResource(context.getResources(),
R.drawable.chrono);
From here I will also declare a height and width integer
that will determine my cell height and width.
Additionally I will need to declare the spritesheet rows and columns
based on my spritesheet that I imported.
private int cellWidth;
private int cellHeight;
private static final int spriteSheet_Rows =4;
private static final int spriteSheet_Cols =4;
Then define it in my constructor as the height/width divided
by the spritesheet rows/columns.
cellWidth = spriteSheet.getWidth()/spriteSheet_Cols;
cellHeight = spriteSheet.getHeight()/spriteSheet_Rows;
Next, I will draw the spritesheet in the onDraw method, but
first I need to define the cells but first I must find a way to keep track of
each from I am on within the animation as well as define rectangles that represent the cells in my
spritesheet. To do that I will need to
make 2 integers that will determine the starting x and y positions of my
current cell/frame and set them equal to the current frame times the
height/width of each cell so that at each frame I will always start drawing at
the top left hand corner of the cell.
int sourceX =currFrameWidth* cellWidth;
int sourceY= currFrameHeight* cellHeight;
Note, you will also need to declare currFrameWidth/Height, I
declared both of them at 0, so that we start at 0,0 of the spritesheet.
Next I will make a rectangle to determine the dimensions of
each cell. The rectangles take 4
arguments, which is left, top, right and bottom which draw the rectangle.
Rect src= new Rect(sourceX,
sourceY, sourceX+ cellWidth, sourceY+ cellHeight);
The next rectangle that I will define will be the
destination rectangle which will be where on the location on the canvas that
the source rectangle will draw on. I will
use x, y coordinates of the canvas sized
by the length and width of each cell.
Note x and y will start at 0, but will change as the spritesheet updates
on screen.
Rect dst= new Rect(x, y, x+ cellWidth, y+ cellHeight);
Lastly I will draw the spritesheet on canvas using the
source and destination rectangles.
canvas.drawBitmap(spriteSheet, src, dst, null);
I am also going to make an update method so that I can work
the animation and movement logic.
private void update(){
}
I will call the update
method within the onDraw method, additionally I will also call invalidate at
the end of the onDraw method which forces the onDraw method to draw again each
time it onDraw is called. My final
onDraw method looks something like this.
@Override
protected void onDraw(Canvas
canvas){
update();
canvas.drawBitmap(rightArrow, 50, 400, null);
int sourceX =currFrameWidth* cellWidth;
int sourceY= currFrameHeight* cellHeight;
Rect
src= new Rect(sourceX,
sourceY, sourceX+ cellWidth, sourceY+ cellHeight);
Rect
dst= new Rect(x, y, x+ cellWidth, y+ cellHeight);
canvas.drawBitmap(spriteSheet, src, dst, null);
invalidate();
}
Within my update method, I can draw
my frames. Since I am doing the right
movement in this example, and the right sprites in the spritesheet are on the 3rd
row, I will need to set the currFrameHeight to 2 (since each frame starts at
0). I also only want these frames to be
called if the user is pressing down on the right d-pad button, so I can
validate this by putting all my right movement touch logic with a touchR if
condition like so.
if(touchR!=0){
currFrameHeight = 2;
}
Within the if condition right
after setting the currFrameHeight, I can calculate the boundaries of the screen
so that the character does not move beyond the right side or left side of the
screen. So to do the bounds for the left
side of the screen, I basically as if x < 0, then I can set the speed of x
to 0 and the currFrameWidth to a standing position which is also 0. An xSpeed can be created and used in our
method by simply declaring xSpeed as an int and defining it as 0. We will call xSpeed a little later and set
that to be the speed of our x movement across the screen. For now, this is your bounds for the right
side of the screen if utilizing xSpeed.
if(x<0){
xSpeed=0;
currFrameWidth = 0;
}
Next I can work the bounds of the
right side of the screen, the condition that we will check for is to see if the
x position is more than the width of the screen (which is the right side of the
screen), minus the width of the cell, which is the right side of the cell. The logic within the if condition would be
the same logic for the bounds of the left side of the screen.
if(x>this.getWidth()-cellWidth){
xSpeed=0;
currFrameWidth = 0;
}
Lastly, I can create an else,
which in this case will increase x upon the xSpeed, and increase the current
from count.
else{
x=x+xSpeed;
currFrameWidth++;
}
Within the else you will
also want to put another if condition which will check to see if the
currFrameWidth is the last cell in the row, and if it is, reset the currFrameWidth
to the first cell in the spritesheet.
if(currFrameWidth==spriteSheet_Rows)
currFrameWidth =0;
I will also want to
create another if condition that will check to see if the user is not touching
the screen. If they are not touching the
screen, I will have the user stop and reset to the first frame in the row.
if(touchR==0){
currFrameHeight = 2;
currFrameWidth = 0;
}
In the end my update method looks
something like this.
private void update(){
//moving Right
if(touchR!=0){
currFrameHeight = 2;
if(x<0){
xSpeed=0;
currFrameWidth = 0;
}
if(x>this.getWidth()-cellWidth){
xSpeed=0;
currFrameWidth = 0;
}
else{
x=x+xSpeed;
currFrameWidth++;
if(currFrameWidth==spriteSheet_Rows)
currFrameWidth =0;
}
}
if(touchR==0){
currFrameHeight = 2;
currFrameWidth = 0;
}
}
Upon testing, you should be able to press the right direction and the character should move in the right direction so long as you are holding the right d-pad button down until the player runs into the right side of the screen.
Upon testing, you should be able to press the right direction and the character should move in the right direction so long as you are holding the right d-pad button down until the player runs into the right side of the screen.
Now that you have the framework,
you can program the rest of the buttons, which will use very similar logic to
our first button.
No comments:
Post a Comment